Long-lasting insulated siding represents a significant investment in home improvement, offering both enhanced energy efficiency and lasting curb appeal. This guide delves into the various materials, installation techniques, maintenance strategies, and cost considerations associated with this popular exterior cladding option, empowering homeowners to make informed decisions about enhancing their property’s value and comfort.
From understanding the thermal performance of different materials like vinyl, fiber cement, and metal, to mastering proper installation and maintenance procedures, this comprehensive resource provides a step-by-step approach to maximizing the lifespan and benefits of your insulated siding. We’ll explore cost-effectiveness, environmental impact, and frequently asked questions to ensure you have a complete understanding before embarking on this home improvement project.
Material Composition and Properties of Long-lasting Insulated Siding
Choosing the right insulated siding can significantly impact a building’s energy efficiency, curb appeal, and lifespan. Understanding the material composition and properties of various options is crucial for making an informed decision. This section will explore the different materials used, their thermal performance, and the role of UV resistance and weatherability in their longevity.
Material Options for Insulated Siding
Several materials are commonly used in the construction of long-lasting insulated siding, each with its own advantages and disadvantages. These include vinyl, fiber cement, metal, and engineered wood. Vinyl siding is known for its affordability and low maintenance, while fiber cement offers superior durability and fire resistance. Metal siding, typically aluminum or steel, is exceptionally durable and weather-resistant, but can be more expensive. Engineered wood siding provides a natural look but requires more maintenance than other options.
Thermal Performance Comparison of Siding Materials
The thermal performance of insulated siding is a key factor influencing energy efficiency. This is typically measured by the R-value, which represents the material’s resistance to heat flow. Higher R-values indicate better insulation. The following table provides a comparison of the thermal performance, durability, and cost of common siding materials. Note that R-values can vary depending on the thickness and specific product.
| Material | R-Value (per inch) | Durability | Cost (Relative) |
|---|---|---|---|
| Vinyl | 0.08 – 0.11 | Moderate; susceptible to impact damage | Low |
| Fiber Cement | 0.08 – 0.11 (varies greatly depending on thickness and additives) | High; resistant to fire, rot, and insects | Medium-High |
| Aluminum | 0.05 – 0.07 | High; resistant to corrosion and pests | Medium-High |
| Steel | 0.06 – 0.08 | High; very durable but can dent | High |
| Engineered Wood | 0.1 – 0.2 (varies greatly depending on composition) | Moderate to High; depends on the specific product and treatment | Medium |
UV Resistance and Weatherability
Exposure to ultraviolet (UV) radiation from sunlight and various weather conditions significantly impacts the longevity of insulated siding. UV radiation can cause fading, cracking, and degradation of the siding’s surface, reducing its aesthetic appeal and structural integrity. Weatherability, encompassing resistance to moisture, temperature fluctuations, and wind, is equally crucial. Materials with high UV resistance and excellent weatherability are essential for long-lasting performance. For example, vinyl siding often incorporates UV stabilizers to enhance its longevity, while fiber cement is inherently resistant to moisture damage. Proper maintenance, such as regular cleaning, can further extend the lifespan of the siding, regardless of the material used.
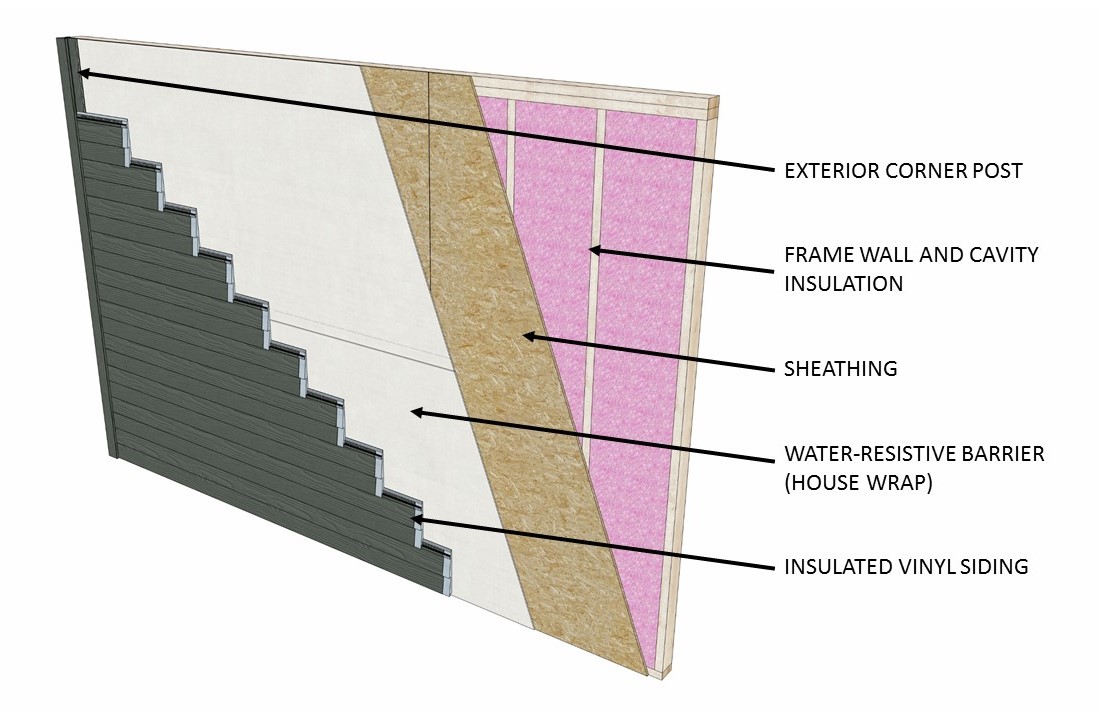
Cross-Section of Insulated Siding Types
The following description depicts a visual representation of the cross-section of different insulated siding types.
Imagine three panels side-by-side, each representing a different siding type: vinyl, fiber cement, and insulated metal.
Vinyl Siding: The outermost layer is a relatively thin layer of colored vinyl, providing the aesthetic finish. Beneath this is a layer of foam insulation, typically polyisocyanurate (polyiso) or expanded polystyrene (EPS), offering thermal resistance. The innermost layer is a backing sheet, often made of plastic, for structural support.
Fiber Cement Siding: This panel shows a thicker outer layer of fiber cement, a composite material known for its durability. A layer of foam insulation, similar to vinyl siding, is positioned beneath. The back is a thin layer of backing board for structural integrity.
Insulated Metal Siding: This panel displays a thin outer layer of metal (aluminum or steel), known for its durability and weather resistance. A substantial layer of foam insulation, usually polyiso or polyurethane, is sandwiched between the metal skin and a backing sheet. The back layer is a reinforcing backing for stability.
Each panel’s cross-section visually illustrates the layering – outer protective layer, insulation core, and inner support layer – highlighting the interplay between aesthetics, thermal performance, and structural integrity. The thickness of each layer varies depending on the manufacturer and the specific product.
Installation Methods and Best Practices for Long-lasting Insulated Siding
Proper installation is paramount to achieving the longevity and performance benefits promised by long-lasting insulated siding. A well-installed system will provide years of protection and aesthetic appeal, while poor installation can lead to premature failure, costly repairs, and compromised energy efficiency. This section details the key steps and best practices for successful installation.
Substrate Preparation and Treatment
Before commencing installation, thorough preparation of the substrate is crucial. This involves cleaning the existing wall surface to remove loose paint, debris, and any mold or mildew. Any damaged areas of the underlying sheathing should be repaired or replaced. This ensures a stable and even surface for the siding to adhere to, preventing future problems. Furthermore, the application of a suitable primer or water-resistant barrier can enhance the longevity and performance of the siding system, protecting it from moisture ingress. For instance, in areas prone to high humidity, applying a specialized moisture-resistant membrane before installing the siding is a highly recommended best practice.
Step-by-Step Installation Guide
The specific steps may vary slightly depending on the type of insulated siding used, but a general guide includes:
- Start with accurate measurements: Precise measurements are essential to minimize waste and ensure a proper fit. Carefully measure the wall area to determine the number of siding panels needed, accounting for overlaps and cuts.
- Install starter strips: These provide a level and straight base for the first row of siding panels. Ensure they are properly aligned and secured to the substrate.
- Install siding panels: Begin at a corner or designated starting point, and work your way across the wall. Each panel should be securely fastened using the manufacturer’s recommended fasteners and spacing. Overlapping panels should be installed according to the manufacturer’s specifications to ensure a watertight seal.
- Install corner and trim pieces: These are crucial for completing the look and ensuring a neat finish. Properly fitting these pieces helps to protect the edges of the siding from damage and weather exposure.
- Caulk and seal all joints: This is critical for creating a watertight barrier. Use a high-quality, exterior-grade caulk to seal all joints and seams between panels and around windows and doors.
- Install flashing: Properly installed flashing is essential to divert water away from vulnerable areas such as windows, doors, and rooflines. Failure to properly install flashing can lead to water damage behind the siding.
Ensuring Watertight and Airtight Installation
Achieving a watertight and airtight installation is vital for maximizing the lifespan and energy efficiency of the siding. This requires careful attention to detail throughout the installation process. Proper flashing around windows and doors, the use of sealant at all joints and seams, and ensuring that the siding panels are properly overlapped and secured are all critical elements. Neglecting these details can lead to water penetration, mold growth, and significant energy loss. For example, the use of a continuous air barrier behind the siding can significantly improve the building’s thermal performance.
Common Installation Mistakes and Their Consequences
Several common mistakes can significantly compromise the longevity and performance of insulated siding. These include:
- Improper substrate preparation: Failing to properly prepare the substrate can lead to poor adhesion, cracking, and eventual failure of the siding.
- Incorrect fastener placement: Using the wrong type or size of fasteners, or spacing them incorrectly, can lead to loose panels and compromised weather protection.
- Insufficient caulking and sealing: Inadequate sealing allows water penetration, leading to rot, mold growth, and energy loss.
- Neglecting flashing: Improperly installed or omitted flashing can result in water damage behind the siding.
- Ignoring manufacturer’s instructions: Failure to follow the manufacturer’s specific instructions can lead to a variety of problems, including voiding the warranty.
Maintenance and Repair of Long-lasting Insulated Siding
Proper maintenance significantly extends the lifespan of long-lasting insulated siding, preserving its aesthetic appeal and energy efficiency. Regular cleaning and inspections are crucial for early detection of potential problems, allowing for timely and cost-effective repairs. Neglecting maintenance can lead to more extensive and expensive damage in the long run.
Maintenance Schedule for Long-lasting Insulated Siding
A proactive maintenance schedule will help keep your siding in top condition. This should incorporate both regular cleaning and periodic inspections. The frequency of these tasks depends on factors like climate and environmental conditions.
| Task | Frequency | Procedure | Benefits |
|---|---|---|---|
| Cleaning | Twice yearly (spring and fall) | Use a soft-bristled brush and a solution of mild detergent and water. Rinse thoroughly with a garden hose. Avoid high-pressure washers, which can damage the siding. | Removes dirt, grime, and pollutants, preventing staining and maintaining the siding’s appearance. |
| Inspection | Annually (during spring cleaning) | Carefully examine the entire siding surface for cracks, dents, discoloration, loose panels, or signs of water damage. Pay close attention to areas prone to impact, such as corners and edges. | Early detection of problems allows for timely repairs, preventing minor issues from becoming major problems. |
Common Repair Methods for Insulated Siding
Addressing damage promptly is essential to prevent further deterioration. Minor issues can often be fixed with simple repairs, while more significant damage may require panel replacement.
| Issue | Cause | Repair Method | Prevention |
|---|---|---|---|
| Cracks | Impact damage, thermal expansion/contraction | Small cracks can sometimes be filled with a high-quality exterior-grade caulk matched to the siding color. Larger cracks may require panel replacement. | Regular inspections, protecting the siding from impact damage (e.g., using protective barriers during landscaping or construction). |
| Dents | Impact damage | Minor dents may be able to be carefully pushed back into place. More significant dents may require panel replacement. | Protecting the siding from impact damage. |
| Discoloration | Exposure to the elements, mildew growth | Cleaning with a mild detergent solution is often sufficient. Persistent discoloration may require specialized cleaning products or, in severe cases, panel replacement. | Regular cleaning, prompt removal of mildew or mold. |
Replacing Damaged Sections of Insulated Siding
Replacing damaged sections requires careful removal of the affected panel and installation of a new one. It is important to follow the manufacturer’s instructions and use appropriate tools and materials. For significant damage or if you lack experience, it’s advisable to consult a professional siding installer. The process typically involves removing fasteners, carefully removing the damaged panel, preparing the surrounding area, and installing the new panel, ensuring proper alignment and secure fastening.
Cost-Effectiveness and Life Cycle Analysis of Long-lasting Insulated Siding
Investing in long-lasting insulated siding represents a significant upfront cost, but a thorough life cycle analysis reveals its potential for substantial long-term savings. This analysis considers the initial purchase price, installation expenses, energy cost reductions, maintenance requirements, and the siding’s lifespan to determine the overall financial viability of the investment.
Initial costs vary considerably depending on the chosen material, complexity of installation, and regional labor rates. Understanding these variables is crucial for making an informed decision.
Comparison of Initial Costs for Different Long-lasting Insulated Siding Options
Several types of long-lasting insulated siding exist, each with its own price point. Fiber cement siding generally falls within a mid-range price bracket, offering a balance of durability and aesthetics. Vinyl siding is typically the most affordable option, while engineered wood and metal sidings command higher initial costs due to their superior performance characteristics and longevity. The actual cost per square foot will vary based on the specific product, supplier, and region. For example, vinyl siding might range from $3 to $10 per square foot, while fiber cement could cost between $8 and $20 per square foot, and metal siding could exceed $20 per square foot. These figures are estimates and can fluctuate based on market conditions and specific product features.
Long-Term Cost Savings Associated with Energy Efficiency and Reduced Maintenance
Insulated siding significantly reduces energy consumption by improving a home’s thermal envelope. This translates to lower heating and cooling bills throughout the siding’s lifespan. The extent of these savings depends on factors such as climate, existing insulation levels, and the R-value of the siding. For instance, a home in a colder climate with poorly insulated walls might see a considerable reduction in energy bills, potentially offsetting a significant portion of the initial investment over a few years. Furthermore, the durability of long-lasting insulated siding minimizes the need for frequent repairs and replacements, further reducing long-term costs. High-quality materials resist damage from weather, pests, and general wear and tear, thereby reducing maintenance expenses compared to less durable alternatives.
Return on Investment (ROI) Calculation for Long-lasting Insulated Siding
Calculating the ROI for insulated siding involves comparing the total cost of ownership (initial cost plus maintenance and energy costs over the siding’s lifespan) to the total savings (reduced energy bills and avoided repair costs). A simplified formula can be used:
ROI = (Total Savings – Total Cost) / Total Cost * 100%
To illustrate, consider a hypothetical scenario: A homeowner invests $10,000 in insulated siding. Over 20 years, they save $5,000 on energy bills and avoid $2,000 in maintenance costs. In this case, the total savings are $7,000, and the ROI is calculated as follows:
ROI = ($7,000 – $10,000) / $10,000 * 100% = -30%
This negative ROI suggests that in this specific scenario, the investment may not be immediately cost-effective. However, this is a simplified example and doesn’t account for factors like increased home value or potential tax credits. A more comprehensive analysis would consider these factors.
Factors Influencing the Overall Life Cycle Cost of Insulated Siding
Several factors contribute to the overall life cycle cost of insulated siding. These include the initial purchase price of the material, installation labor costs, the siding’s R-value (insulating capacity), its lifespan, expected maintenance requirements, and regional energy prices. For example, a higher R-value siding will result in greater energy savings but may have a higher initial cost. Similarly, a longer lifespan reduces the need for future replacements, lowering the overall life cycle cost. Regional energy prices directly influence the amount saved on heating and cooling, impacting the ROI calculation. A thorough assessment of these factors is crucial for accurate life cycle cost analysis.
Environmental Impact and Sustainability Considerations
Choosing long-lasting insulated siding involves careful consideration of its environmental impact throughout its lifecycle, from material extraction and manufacturing to eventual disposal. Understanding the sustainability profile of different siding materials is crucial for making informed decisions that minimize environmental burden.
The environmental impact of manufacturing long-lasting insulated siding varies significantly depending on the chosen material. Factors influencing this impact include energy consumption during production, emissions of greenhouse gases and other pollutants, and the depletion of natural resources. Furthermore, the recyclability and disposal options for each material directly affect its overall environmental footprint.
Manufacturing Processes and Emissions
The manufacturing process for different siding materials leads to varying levels of environmental impact. For instance, vinyl siding production is energy-intensive and often involves the use of non-renewable resources and the release of volatile organic compounds (VOCs). Fiber cement siding, while more durable, requires significant energy input during its manufacturing process, involving high-temperature curing and the use of cement, which has its own carbon footprint. Wood siding, sourced sustainably, has a lower embodied carbon footprint compared to other materials, provided it comes from responsibly managed forests. However, the processing and treatment of wood can still contribute to emissions. Finally, metal sidings, like aluminum or steel, have a higher initial embodied carbon footprint due to the energy-intensive extraction and processing of the metals. However, their recyclability significantly mitigates their long-term environmental impact.
Material Recyclability and Disposal Options
Recyclability varies significantly across siding materials. Vinyl siding has limited recyclability, with many communities lacking dedicated recycling programs for this material. Often, vinyl siding ends up in landfills, contributing to plastic waste. Fiber cement siding is generally not recyclable and is usually disposed of in landfills. Wood siding, if untreated, can be composted or used for biomass energy. However, treated wood often contains chemicals that limit its suitability for these methods. Metal sidings, including aluminum and steel, are highly recyclable and can be readily melted down and reused in new products. The recycling rates for these materials are generally high, reducing their overall environmental burden.
Embodied Carbon Footprint Comparison
The embodied carbon footprint, representing the total greenhouse gas emissions associated with a product’s entire lifecycle, is a key indicator of a material’s environmental impact. Generally, wood siding, sourced sustainably, has a relatively lower embodied carbon footprint compared to vinyl or fiber cement. Metal sidings typically have a higher initial embodied carbon footprint due to the energy-intensive manufacturing processes. However, their recyclability significantly reduces their overall life-cycle carbon emissions. The precise values for embodied carbon vary depending on factors such as manufacturing processes, transportation distances, and the specific material composition. Life cycle assessments (LCAs) provide a detailed analysis of the environmental impact of each material, enabling more accurate comparisons. For example, a LCA might show that while the initial carbon footprint of steel siding is higher than wood, its long lifespan and high recyclability might lead to lower overall life-cycle emissions over a 50-year period.
Environmentally Friendly Manufacturing Practices and Sustainable Sourcing
Several environmentally friendly manufacturing practices can minimize the environmental impact of long-lasting insulated siding. These include using renewable energy sources in manufacturing plants, reducing waste generation through efficient processes, and employing recycled materials in the production of siding. Sustainable sourcing of raw materials is also critical. For wood siding, choosing sustainably harvested timber from certified forests is essential to reduce deforestation and promote responsible forest management. For metal sidings, selecting materials made from recycled content minimizes the need for new resource extraction. Similarly, manufacturers are exploring the use of bio-based materials and recycled plastics in vinyl siding to reduce its environmental impact. These practices, coupled with improved end-of-life management strategies, are vital for promoting the environmental sustainability of long-lasting insulated siding.
Outcome Summary
Ultimately, choosing long-lasting insulated siding is a decision that balances initial investment with long-term benefits. By carefully considering the material properties, installation process, and maintenance requirements, homeowners can significantly improve their home’s energy efficiency, aesthetic appeal, and overall value. This guide has equipped you with the knowledge to make an informed decision, ensuring your investment yields substantial returns for years to come.